


Loklik machine with custom faux leather bag tags.
Are you looking to add a personal touch to your luggage or handbags? Maybe, you want a personalized keychain tag, instead. Making your own faux leather bag tags isn't only fun but also incredibly easy with the Loklik cutting machine. Here’s how you can do it:
Materials Needed:
- Loklik Cutting Machine
- Loklik IdeaStudio Software (PC App)
- Faux Leather Sheet
- Strong Grip Cutting Mat
- Standard Grip Cutting Mat
- Painter's Tape
- Heat Transfer Vinyl / Iron-On Vinyl
- Weeding Tools
- Mini Heat Press
- Pressing Mat
- Teflon Sheet or Parchment Paper
- Keychain Clips
- Paintbrush
- Wood Glue or Fabric Glue
Step 1: Design Your Tag
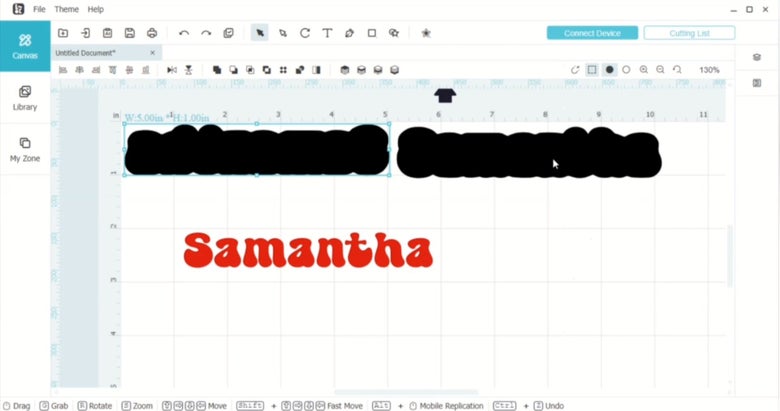
Start by creating your design in the Loklik IdeaStudio. Once you've opened the software, the first thing you want to do is right-click on the mm in the top left corner of the canvas and change it to in. You can use the mm canvas, but this tutorial will be using in.
Next, select the text tool, which is represented by a T in the upper tool bar. Click on the canvas to place the text box. Type in whatever name or word you choose. It can be a first name, last name, team name, or favorite word, such as Love, Blessed, or Faith.
Once you have your text, it's time to choose a font. You can choose from the list of fonts found in the Loklik software, or you can use fonts you already have downloaded onto your computer by going into the System list of fonts. (TIP: You can find free fonts to download for personal or commercial use at FontSpace, DaFont, or FontBundles. FYI: If you download fonts to your computer while the Loklik IdeasStudio is open, you will need to reboot the app so the new fonts can be installed into the system.)

Once you have your word and chosen font, change the color of the text to something other than black or white. If you'd like to see how your finished tag will look, you can make it the color of the vinyl you plan to use. Unless it's black or white, then, change it to something else. This will allow you to see it against the white canvas and the black offset we will be making in the next step.

Next, select your text and drag the corner with your cursor to make the text about 5 inches long, or a good enough size that you can put an offset on it. You can adjust it to proper size once you have the offset. With the text still selected, go up to the Offset tool, which is represented by a black star with an outline around it. Adjust the Offset Distance to a size that leaves no holes in your offset or text. You don't want to make it too big, just big enough to get rid off any holes that may appear as you adjust the offset.

Once you have your offset how you want it, click on a blank area on the canvas to reset the cursor. Then, click and hold a blank area on the canvas near the text and offset. Drag over both elements so as to select them together. This will allow you drag the corner and adjust the element to the desired size. The mat is 12 inches. You're going to need to make the leather double the length of the offset. You're also going to have to add a one-inch tab between the two offsets. So, try to keep it no longer than 5 inches.
At this point, you can adjust the colors to match the faux leather and vinyl you'll be using, if you choose to do so. Just click on each element, separately. A menu will pop up on the right of your screen. Here, you can choose the color of each from the Fill section.
Now that you have a good idea how your tag will look when you're done, reset the cursor by clicking on a blank area on the canvas. Then, click on the text and set it aside somewhere beneath the offset. Right-click on the offset and select Copy. Right click on the blank canvas, then, select Paste. This will leave you with 2 offsets and the text you typed.

Next, click on the second offset you made to select it, then, click on Horizontally Flip in the upper tool bar. It's represented by a black triangle on the left, a white triangle on the right with a line down the middle. Place the two offsets next to each other. Leave one inch between the two.
Now, go up to Shape, represented by an empty square in the upper tool bar, and select the Rectangle tool from the drop-down menu.

Move your cursor to about one-third of the way down the right side of the offset on the left. Click and drag down to about a third from the bottom of the offset and over to the other offset, connecting the two. Make sure the color of the rectangle is the same color as your offsets.

Once you have the rectangle tab in place, reset your cursor, again, on the blank canvas, then, click and drag over the two offsets and the tab to temporarily connect them together. Click the Center Vertically tool, which is represented by two uneven, vertically positioned rectangles with a line crossing through the center of the two. This will ensure all three elements are aligned properly and evenly.

At this point, you'll need to contour all the elements. Just go up to the top-right of the tool bar and select the empty circle. This will leave all elements in outline form. You will see the tab overlaps the two offsets. You will have to unite those by clicking and dragging the cursor to temporarily group them together. Then, clicking the Unite tool, which is represented by two black squares overlapping each other.


Now, you have your design and all your elements prepared for cutting. Click on Layer, which is represented by 3 sheets of paper, in the far-right tool bar. Click on the eye beside the text layer to hide it. Place the element starting about a quarter to a half inch from the top-right corner of the canvas. This will be space for the tape you will use to tape down the faux leather to the mat.
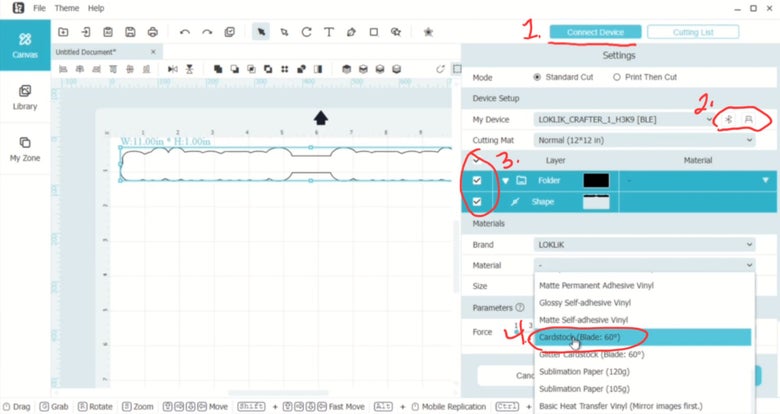
Go up to the right and select Connect Device. Connect your Loklik machine to your computer via Bluetooth or USB by clicking one of the corresponding icons. Once you're connected, check the boxes to select the Layer, Folder, and Shape that you'll be cutting. You hid the text, so all 3 boxes should be checked. For Materials section, leave the brand as Loklik, but for the material select Cardstock (60°). Up the Force to 5.0. Click on the Cut button.

Step 2: Prepare Your Materials
Before proceeding to click 'Start' on the subsequent screen, ensure you trim your faux leather to fit the dimensions of the element on your canvas, leaving ample margin for taping around the borders. Avoid cutting the leather too large to prevent it from shifting during the cutting process. Aim for the smallest size that still allows the leather to remain taut during cutting, minimizing movement. If your blade crosses over the tape, it's not an issue; just remember to remove the tape from your final leather piece, as the cut section will adhere to it.
Proceed to prepare your Standard Grip mat by placing the vinyl you intend to use on it. Ensure that the vinyl is positioned shiny side down at the top right corner of the mat, as that is where it will cut once the text has been mirrored. Secure it with tape, similar to how you affixed the faux leather.


Step 3: Cutting Process
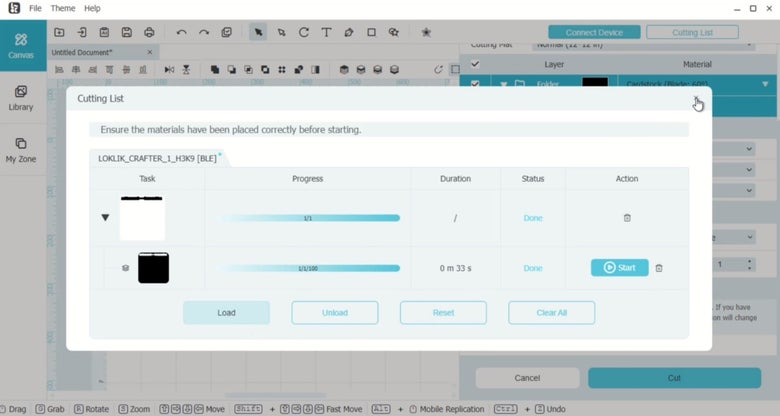
Secure the faux leather onto the strong grip cutting mat to avoid any movement during the process. Insert the mat into your Loklik cutting machine. Proceed to initiate the cutting sequence by clicking 'Start' on the Cutting List screen.
Once your leather has been cut, close out the Cutting List and click Layer from the right-side tool bar. This time, hide the offset element and make visible the text.
Place the text in the upper left corner of the mat, about a quarter inch from the edges.
Load your standard grip mat with the vinyl into your Loklik machine.

In the Loklik IdeaStudio, click Connect Device. Check the Layer box which will automatically check the Folder and Text boxes, which will be the element you're cutting. Set the material to Basic Heat Transfer Vinyl, and click the first option on the Canvas Mirror line. This is going to mirror the image horizontally. Click Cut.

This will open the Cutting List, again. You can see in the preview box that the element is now sitting on the right side of the mat. That is perfect, because that's the side you put the vinyl on the mat. Once you've confirmed the image is where it should be, click the Start button.

Step 4: Weeding
Once the machine has finished cutting, remove the mat and carefully weed out the excess material from your carrier sheet.

Step 5: Apply the HTV/Iron-On to Leather
Preheat your mini press to 302°F / 150°C.
Lay your leather piece flat, right side up, on a pressing mat.
Place the carrier sheet with the vinyl onto the leather piece where it should go. Make sure the carrier sheet covers the faux leather completely, as it will protect the leather from melting, and will prevent any lines being melted into the leather, as well.

Cover the carrier sheet and leather with either a teflon sheet or parchment paper.

Using your mini heat press, press down on the vinyl for 10 seconds at a time. Lifting and moving to the next area, but making sure as to not go to the edge of the carrier sheet where it meets the tab in the middle, as it will melt the leather and cause there to be a line in the leather. You can iron back and forth for a few seconds to "seal the deal."

Lay vinyl side down on a cool surface so as to allow it to cool. Once cool, slowly lift the carrier sheet, checking to see if the vinyl lifts. If it does, lay the carrier sheet back down, and re-press for a few seconds. Allow to cool, again. Then, slowly peel back the carrier sheet, checking, once again, to see if the htv is adhered or not. If so, finish peeling the carrier sheet from the leather.
Step 6: Assemble Your Tag
Next, slide the leather piece into the D-ring of the keychain clip or keyring until you reach the little rectangle tab that connects the two offsets.


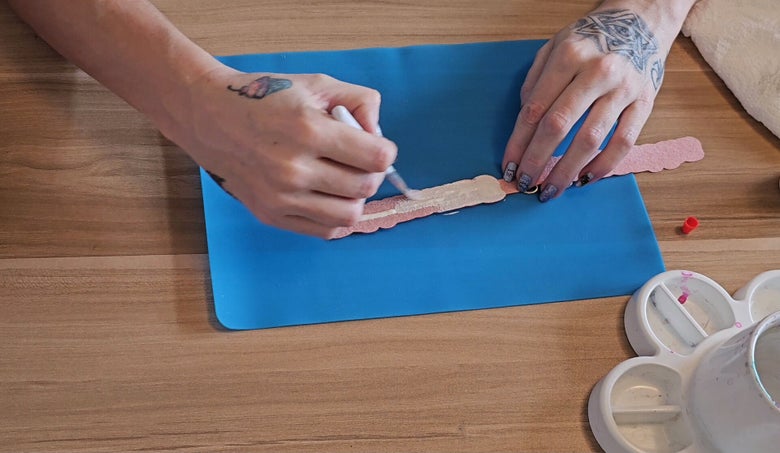
Lay the faux leather right-side facing down on a silicone mat or some kind of paper to protect your surface. Apply glue to one of the offsets, starting where the rectangle tab meets the offset part with a small, flat paintbrush. Making sure to go all the way to the edge of the leather, covering every inch of the area. Avoid applying glue to the rectangle tab.
Note: We prefer wood glue, but you can also use fabric glue or rubber cement. We don't recommend hot glue sticks or school glue. Alternatively, if you like to sew and have a sewing machine, you can choose to sew them together using a decorative stitch, or you can use embroidery thread and a leather needle to hand stitch them together.
After applying the glue, fold the other side of the leather piece over onto the glued side and press together.

Lay the bag tag flat on your silicone mat, or paper, onto a hard surface. Place a book, or something flat that has some weight to it, on top of the leather piece, being careful to avoid covering the keyring/clip. Allow to dry completely for 24 hours.

Step 6: Finishing Touches
Once dry, it's ready to attach to your favorite bag, keys, belt, etc. However, there are many other possibilities for your tag. You can glue some rhinestones or other embellishments to the faux leather. You can add some decorative stitching, as mentioned earlier. It's whatever you want to do. Put your signature on it!
And there you have it! Your very own custom faux leather bag tag, ready to accompany you on your travels.
Remember, you can always experiment with different colors and textures of faux leather to match your style. You can even modify it from a bag tag / keychain to a book mark. Instead of placing the keychain clips/rings between them, apply glue halfway up the rectangle tab. Once dry, slide a ribbon of your desired length into the slot and tie a knot near the top of the tab, and BOOM! Bookmark!
I hope you enjoyed this tutorial. Thanks for stopping by our website. If you'd like to see more tutorials for using the Loklik Cutter, or if you have any questions about the Loklik Cutter, or if there is just anything else you'd like to know, leave us a comment. We'll try to create a tutorial on our blog or we'll answer you in the comments.
Keep dreaming big, never limiting your imagination! All things are possible! Have a fantastic day! Happy crafting!
DISCLAIMER: As an Amazon Associate, we will earn a small commission, at no extra cost to you, if you make a purchase through the above links. We are not employees of Amazon. We just love shopping at Amazon and sharing our favorite products. We appreciate any and all purchases made through our links, as they allow us to keep making stuff so we can keep sharing it with you! Thanks so much for your support! ❤️❤️❤️
Add comment
Comments